
Crypto
29 Jul 2026
Read 12 min
How to make copper RAM heatsinks in 45 minutes *
how to make copper RAM heatsinks to save $20 and improve cooling using insulating pads to avoid shorts
Learn how to make copper RAM heatsinks at home using scrap copper pipe, simple tools, and safe thermal pads. This 45-minute mod can lower temperatures, add style, and save money. Follow clear steps, avoid shorts with insulation, and decide if your stock or overclocked memory really needs extra cooling.
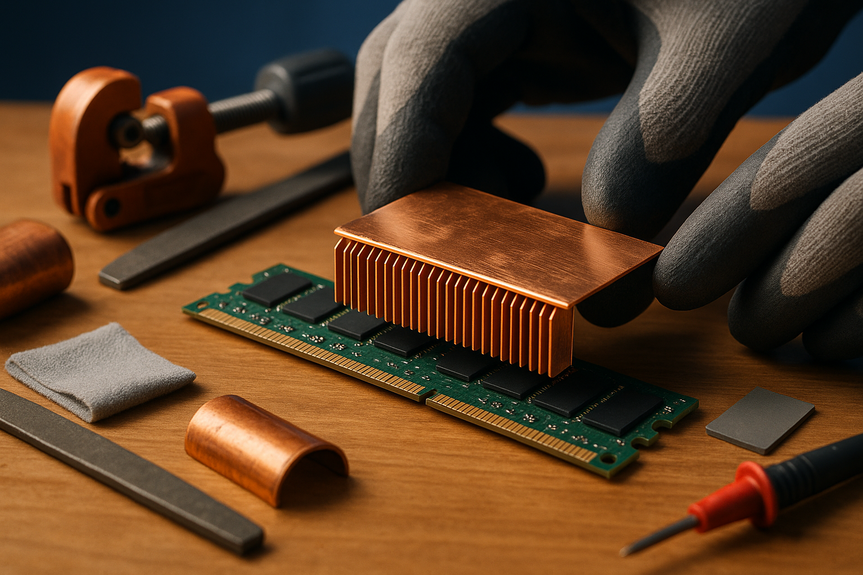
PC builders love a good hack, especially when prices rise and small parts cost more than they seem to. A Reddit modder showed how a few inches of copper pipe and patience can turn into neat RAM heatsinks. The result looked close to store-bought gear and sparked debate about safety and need. If you want to try it, you should plan your build, protect your parts, and test before you trust it in your daily rig.
Why DIY RAM cooling is getting buzz
Builders want control, savings, and a personal touch. Add-on RAM coolers can cost around $20 per stick. If you already have tools and some scrap copper, a DIY route can cost far less. It also teaches you how heat moves in a PC and how small changes affect airflow and stability. But the talk around this project also showed a key truth: copper is great at moving heat and electricity. You must use insulation and proper pads or you risk a short.How to make copper RAM heatsinks: tools, steps, and timing
Materials and tools
- Clean copper pipe (common plumbing pipe works)
- Hacksaw or pipe cutter
- Vise and pliers
- Hammer and small anvil or flat steel block
- Metal file and sandpaper (400–1000 grit)
- Thermal pads (non-conductive, 0.5–1.0 mm thick)
- Kapton tape or other high-temp, non-conductive tape
- Isopropyl alcohol and lint-free cloth
- Optional: metal polish, clear coat, or matte spray
Step-by-step guide
- Measure your RAM. Note the height of the chips, clearance near the CPU cooler, and any RGB diffusers. Plan a plate that does not hit slots, clips, or heatpipes nearby.
- Cut the pipe. Saw a length slightly longer than the RAM PCB. Split the pipe lengthwise to create a sheet.
- Flatten the copper. Place it in a vise and hammer gently until flat. Work slowly to avoid kinks.
- Shape the plate. Mark the RAM chip area on the copper. Cut to size. Round corners to prevent cuts and shorts.
- Smooth the surfaces. File edges. Sand both sides until they are even. A flat, smooth face improves pad contact.
- Dry fit. Place the plate near the RAM (not touching) to check clearance in your case. Adjust bends if needed.
- Insulate the RAM. Cover exposed resistors and traces near the chips with Kapton tape. Do not cover the chip tops where heat must pass.
- Add thermal pads. Cut pads to match the chip zones. Place pads on the RAM or inside the copper plate. Pads must be non-conductive.
- Mount the plate. Press the copper gently against the pads. Use light brackets, non-conductive ties, or the RAM clip pressure if the fit allows. Do not crush the PCB or chip packages.
- Final check. Confirm no bare copper touches any solder joints, pins, or neighboring slots. Verify the plate clears latches and nearby heatsinks.
Time and cost
Expect about 45 minutes per stick after your first attempt. Cost can be close to zero if you have scrap copper and tools, plus a few dollars for pads and tape. The time goes into shaping, smoothing, and safe mounting.Safety first: stop shorts before they start
Insulation is non-negotiable
Copper conducts electricity. A tiny touch on a resistor or pad can short a DIMM or even a motherboard. Use high-quality thermal pads and non-conductive tape. Keep pads only over chips and put tape anywhere the copper might touch bare parts.Test on old hardware
Try your first build on an old DDR2 or DDR3 stick. Practice fit, pad pressure, and clearance. Move to your main kit only when you trust the process.Power-up checklist
- Is every copper edge smooth and rounded?
- Are all nearby contacts taped?
- Do the latches close without force?
- Does the plate clear the CPU cooler and GPU backplate?
- Do the DIMMs seat fully in the slots?
Do you even need extra RAM cooling?
For most stock-speed kits in a case with decent airflow, the answer is often no. DDR4 and DDR5 at factory voltages typically run cool. Many “heatsinks” on budget memory are there for looks more than need. Extra cooling starts to make sense if:- You overclock memory with higher voltages
- Your case runs hot due to small size or silent profiles
- You render or compile for long sessions in warm rooms
- You chase peak stability at tight timings
Measuring results: what to expect
Track temperature and stability
Use a memory stress tool and a thermal probe, or a spot IR thermometer aimed at the heatsink. Compare before and after:- Run a 20–30 minute memory stress test at your normal settings
- Record ambient room temperature
- Note any errors or WHEA events
- Watch for thermal throttling on adjacent parts (CPU, VRMs)
Finish and looks
Polish for performance and style
A smoother copper face improves pad contact. You can also:- Polish and seal with a clear coat to slow tarnish
- Lightly brush for a satin look
- Paint the outside with high-temp enamel (never paint the pad contact face)
- Match your build theme with vinyl skins (keep adhesive off heat paths)
Who should try this, and who should skip it
Try it if you enjoy hands-on projects, want a unique look, and plan to tune memory voltage or timings. Skip it if your case has poor airflow you could fix with a fan change, or if your system is under warranty and you cannot risk damage. If you only want a style change, a stock heatsink kit may be safer and quicker.Troubleshooting common issues
Plate does not sit flat
Re-flatten the copper in the vise. Check that pads are even height. Mix pad thicknesses if some chips sit taller than others.System does not boot
Power off. Remove the plate. Reseat the RAM. Inspect for copper contact with components. Replace any torn pads or tape. Boot with one stick at a time.Temps did not improve
Verify pad coverage. Too little pad area reduces heat transfer. Ensure case airflow moves across the RAM zone. A small 92 mm side fan can help more than thicker copper.Cost and value vs store-bought options
DIY copper plates can beat the price of retail kits, especially if you repurpose materials. Retail options, however, offer proven clearances, safer mounting, and clean finishes. The DIY route shines when you want to learn, save, and build something that fits your rig exactly. For many builders, that journey is the reward. If you want to know how to make copper RAM heatsinks and get results you can trust, plan your layout, insulate every risk point, and test before daily use. This quick, low-cost mod can look great and help stability under load. Above all, be honest about your needs: stock RAM rarely needs it, but tuned memory can benefit.(Source: https://news.bitcoin.com/a-gamer-boosted-his-ram-with-diy-copper-pipe-heatsinks-in-45-minutes-49201/)
For more news: Click Here
FAQ
Q: What tools and materials are needed to make DIY copper RAM heatsinks?
A: For how to make copper RAM heatsinks, gather clean copper pipe, a hacksaw or pipe cutter, a vise, pliers, a hammer and flat steel block, a metal file and sandpaper (400–1000 grit), non-conductive thermal pads (0.5–1.0 mm), Kapton tape, isopropyl alcohol and a lint-free cloth. Optional items include metal polish or a clear coat for finish.
Q: How long does the DIY process take and how much does it cost?
A: Expect about 45 minutes per stick after your first attempt, as noted in the guide. Cost can be close to zero if you repurpose scrap copper and tools, with only a few dollars needed for thermal pads and tape.
Q: Is it safe to use copper plates directly on RAM modules?
A: Copper conducts electricity, so bare copper near exposed contacts can cause short circuits and potentially damage a DIMM or the motherboard. Use high-quality non-conductive thermal pads and Kapton tape, and practice the first build on old DDR2 or DDR3 sticks before moving to your main kit.
Q: What are the key steps to shape and mount a copper heatsink on a RAM stick?
A: Measure clearances, cut and split a copper pipe lengthwise, then flatten and shape the plate to fit while smoothing edges and rounding corners to avoid shorts. Dry-fit the plate, place non-conductive thermal pads over the chips, secure the plate gently with light brackets, non-conductive ties, or RAM clip pressure, and confirm no bare copper touches solder joints, pins, or nearby components.
Q: Do standard RAM modules usually need extra heatsinks?
A: For most stock-speed kits, including DDR4 and DDR5 at factory voltages, extra RAM cooling is often unnecessary if your case has decent airflow. Additional heatsinks become more relevant when you overclock with higher voltages, run in a hot or compact case, perform long sustained workloads, or chase tighter stability rather than large performance gains.
Q: How should I test and measure whether my DIY copper RAM heatsinks are effective?
A: Use a memory stress tool and a thermal probe or a spot IR thermometer to run a 20–30 minute stress test while recording ambient temperature and watching for errors or WHEA events. Expect modest improvements such as a few degrees reduction or more even temps between sticks, and judge success by stability gains rather than big FPS changes.
Q: What safety checks should I perform before powering up after installation?
A: Confirm all copper edges are smooth and rounded, nearby contacts are taped, latches close without force, the plate clears the CPU cooler and GPU backplate, and DIMMs seat fully in their slots. If the system fails to boot, power off, remove the plate, reseat the RAM, and inspect for any copper contact or torn pads.
Q: Who should try building copper RAM heatsinks and who should avoid it?
A: Attempt this if you enjoy hands-on projects, want a custom look, and plan to tune memory voltage or timings, but skip it if your case airflow can be fixed with a fan change or if your system is under warranty and you cannot risk damage. For those who only want style or guaranteed clearances, retail heatsink kits offer safer mounting and cleaner finishes.
* The information provided on this website is based solely on my personal experience, research and technical knowledge. This content should not be construed as investment advice or a recommendation. Any investment decision must be made on the basis of your own independent judgement.
Contents