
AI News
28 Jan 2026
Read 17 min
Clawdbot setup guide: How to run local automations
Clawdbot setup guide shows how to run local automations securely and produce auditable workflows now.
Clawdbot setup guide: Prerequisites and choices
What you need before you start
- A computer or small server running macOS, Windows, or Linux. A low-cost VPS also works.
- Basic terminal access and permission to install a global npm package.
- An API key for a model provider (Anthropic, OpenAI, Google, or another you prefer), or a local model backend if you plan to run models on-device.
- At least one chat channel to connect, such as Telegram, WhatsApp, Signal, Slack, or Discord.
- Optional: a domain or local network access if you plan to use the web control UI from multiple devices.
Decide how you will host
- Home server or desktop: Best for full local control and access to files, shell, and smart home devices.
- Cloud VPS: Good for always-on presence and stable networks. Keep sensitive tools on local Nodes if needed.
- Hybrid: Run the Gateway on a VPS and a Node on your laptop. The Gateway routes requests; the Node performs local actions.
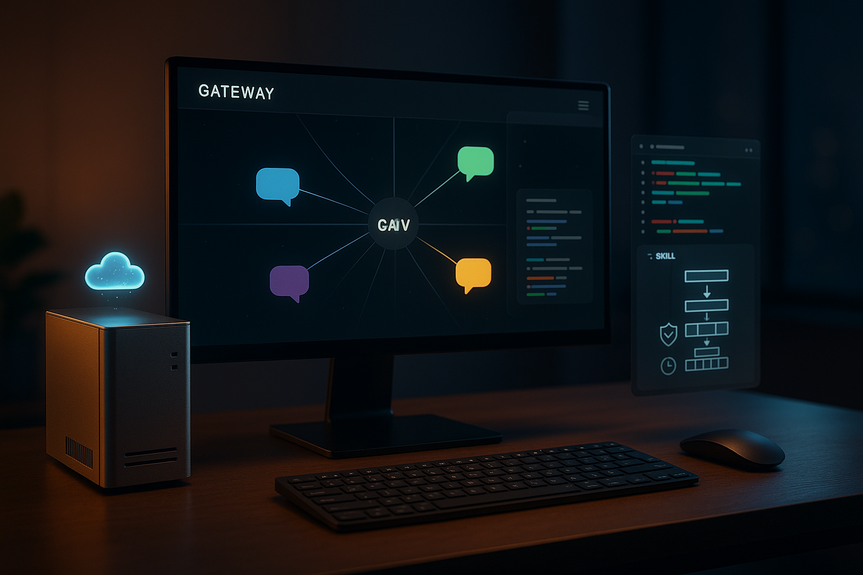
How Clawdbot works: Gateway, Nodes, and Channels
Gateway
The Gateway is the brain. It routes messages, calls models, invokes tools, tracks sessions, and schedules jobs. It exposes a local web UI and a WebSocket control plane on ws://127.0.0.1:18789. Your chat messages arrive here. The Gateway decides which agent to use and which tools are allowed.
Nodes
Nodes are helper processes that give safe access to local resources. A Node can read files, control a browser, listen to a microphone, or call OS-specific APIs. You can run Nodes on macOS, Windows, Linux, iOS, or Android devices. The Gateway sends commands to Nodes when a skill requires local access.
Channels
Channels connect chat platforms like WhatsApp, Telegram, Signal, Slack, Discord, Microsoft Teams, Matrix, or Zalo. You attach channels to the Gateway. Once connected, you can talk to your agent from your favorite app and receive proactive messages.
Skills and ClawdHub
Skills are tools the agent can call. Each skill is described in a SKILL.md file. The file lists what the tool does and the order of steps. ClawdHub is the catalog where you can discover and install skills. You can also write your own skills and keep them local.
Install and onboard in minutes
Step 1: Install the core
- Fast install script: curl -fsSL https://clawd.bot/install.sh | bash
- Or via npm: npm i -g clawdbot
The installer bootstraps Node.js (if needed), the Gateway, and core components.
Step 2: Onboard
- Run: clawdbot onboard
- Choose a model provider and paste your API key.
- Pick a storage location for configuration and memory.
- Confirm the local web UI and the control port. The default WebSocket control plane runs at ws://127.0.0.1:18789.
Step 3: Start and verify
- Start the Gateway: clawdbot start
- Open the control UI in your browser. Check the status page for sessions, channels, and nodes.
- If you run a Node on another device, start it and watch for a successful handshake in the UI.
Connect your chat channels safely
Telegram
- Talk to @BotFather to create a bot and get the token.
- In the Clawdbot UI, add a Telegram channel and paste the token.
- Send a “hello” message to confirm bi-directional delivery.
- Choose your preferred WhatsApp integration backend as supported by your setup.
- Follow the QR or token flow in the UI.
- Test by sending a message to your agent contact from your phone.
Slack or Discord
- Create an app or bot in the platform dashboard.
- Grant minimal scopes the skill needs.
- Install to your workspace or server and invite the bot to a channel.
Set one channel as your default “home” for proactive messages. Use per-channel policies to restrict which skills may run from each app.
Add skills with SKILL.md and ClawdHub
Install community skills
- Open ClawdHub in the UI. Browse skills for messaging, email, calendar, files, shell, or browser control.
- Click install. Review the skill’s description, required permissions, and any environment variables.
- Enable safety options like confirmation prompts and timeouts.
Write your first SKILL.md
A SKILL.md is a simple Markdown file with a header and an ordered set of steps. For example, a safe project backup skill could say:
- Name: backup-project
- Description: Create a timestamped archive of the current repository and store it in a backups folder.
- Steps: check git status, create archive, verify size, move to backups path, and report success.
- Optional flag: disable-model-invocation: true (so only explicit user approval can run it).
After saving the file, the Gateway reads it and shows a new tool in the UI. You can then ask your agent to “run project backup” and it will execute the steps as described. Because the steps live in text, you can audit changes in git and review them with teammates.
Build reliable automations with Lobster workflows
Why use Lobster
Lobster is a typed workflow runtime. Instead of a model calling tools in a loop, Lobster runs a precise pipeline. Steps pass typed JSON, not loose text. The runtime enforces timeouts, output limits, and sandbox rules. You can pause at an approval step, then resume with a token later. This keeps automations deterministic and easy to trust.
Design a daily briefing pipeline
Here is a simple plan for a daily briefing workflow you can express in Lobster:
- Collect today’s calendar events as JSON.
- Fetch unread emails and extract subjects and senders.
- Ask the model to summarize both sets into bullet points.
- Pause for approval. Show the summary in the UI.
- If approved, send the briefing to your default chat channel.
When you ask, “Send my morning briefing,” the agent resolves the pipeline, fills parameters like date and channel, and runs it. The approval gate prevents surprises. Each run is logged with inputs, outputs, and timing for audit.
Best practices for pipelines
- Keep steps small and single-purpose. This makes errors easy to spot.
- Use conditions for risky actions, like deploy or delete.
- Put rate limits and output caps on web or email steps.
- Prefer structured input and output. Let the model format JSON, not free text.
Proactive routines and scheduling ideas
Use the Gateway as an operator
The Gateway can schedule jobs and track state. You can run automations at a time, on a cadence, or when a condition changes. Here are ideas you can try:
- Daily briefings at 7:30 AM that include calendar, key emails, and a task list.
- Weekly recap on Friday with shipped pull requests, commits, and meeting notes.
- Monitors for CI failures that message you with the logs and a “retry build” button.
- Local file watchers that tag or archive files in a downloads folder.
Because your stack runs locally or on your server, you choose which data leaves your network. Model calls happen only when a pipeline or skill needs them.
Security, privacy, and guardrails
Principle of least privilege
- Enable only the skills you need. Disable high-risk tools by default.
- Restrict shell access to read-only or safe subcommands where possible.
- Scope each channel to the minimal skills it should trigger.
Data handling
- Keep secret keys in environment variables or the encrypted store the Gateway provides.
- Review logs in the UI to see what data flows to a model or tool.
- Prefer on-device summarization for sensitive text when using a local model.
Execution safety
- Use approval gates for side effects like send, deploy, delete, or transfer.
- Set timeouts and output limits on all web and file operations.
- Run Nodes with user-level permissions, not as root.
Troubleshooting and performance tips
Common issues
- Port conflicts: If ws://127.0.0.1:18789 is in use, change the control port in settings.
- Channel delivery: Re-check bot tokens or QR sessions. Send a test message from both sides.
- Model timeouts: Lower prompt size, increase timeout, or switch to a faster model.
- Missing tools: Confirm the skill is enabled and the Node with the needed capability is online.
Make it faster
- Cache recent context and reduce repeated calls in pipelines.
- Use smaller prompts and typed JSON to cut token usage.
- Run a local model for light tasks like classification or extraction.
- Upgrade Node.js to a current LTS for better runtime performance.
Real-world examples you can try today
Inbox triage with approval
- List unread emails and classify them by sender and urgency.
- Draft archive or label actions as JSON.
- Pause for approval, then apply changes only if you approve.
Safe deploy after tests
- Check that the git working tree is clean.
- Run unit tests and parse results.
- Gate the deploy step on test success and an explicit yes.
Smart home check-in
- Read temperature and energy use from local devices.
- Summarize and notify you on your preferred channel if a threshold is crossed.
Project housekeeping
- Find large files in a repository and compress or move them.
- Write a short report with before/after sizes and links.
Standup assistant
- Gather yesterday’s commits, PR comments, and calendar notes.
- Draft a 3-bullet standup update and post it to your team channel after approval.
Who should use Clawdbot and how to choose your stack
Individuals
- Run on a laptop or mini PC. Use Telegram or WhatsApp as your main channel.
- Start with a few low-risk skills: reminders, file cleanup, or daily briefings.
Small teams
- Host the Gateway on a small VPS for uptime. Keep a Node on each developer laptop for local tasks.
- Share SKILL.md files in a repo and review them like code.
Cost and latency
- Use remote models for high-quality summaries or generation.
- Use a local model for quick classification, extraction, and routing to reduce cost and increase speed.
Bookmark this guide and expand safely
You now have the core path: install, onboard, connect a channel, add or write a skill, and ship a Lobster workflow with approval gates. Bookmark this Clawdbot setup guide as you expand your toolbox. Add one skill at a time. Use typed pipelines for every action that matters. Keep logs, approvals, and limits in place so you can trust each run.
With Clawdbot, your assistant lives where your data lives, and it acts like a careful operator. Start today with a simple routine, like a morning briefing. Then move to inbox triage, weekly recaps, and safe deploys. This Clawdbot setup guide is your map from chat to real, reliable automations you control.
For more news: Click Here
FAQ
Contents